
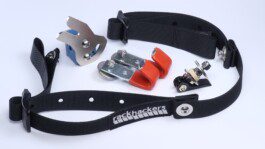
Cannier Set - the DIY pannier parts kit
It contains all the parts you need for transforming a plastic can into a DIY bicycle pannier.
Here you can find some of the aspects that were considered in the design process of the parts. It can also give you ideas on how to use your Cannier.
Design considerations
1. A tight grip
We always wanted a homemade pannier that would have a tight grip on the rack tube, so we only settled for a locking mechanism that is completely fixed in closed position. It feels sturdier and safer, and reduces rattling noises.
2. When the Cannier is taken off
No moving parts are left on the bicycle when the Cannier is taken off, so rattling noises are completely eliminated.


3. Strap durability by design
The holes on the Cannier straps are precisely spaced for the washers to exert sideways pressure on the folded edges, preventing even more the slipping and deformation of the straps. A strap that could slip under the washers would get loaded unevenly at the center.
4. Fast handling
The Cannier's lid can be closed with a single move by pulling down on the side straps simultaneously.


5. Low response to wind
The idea of the sewn hoop first came up as a solution to wind-related noise. Without the extra rigidity and weight on the end of the hoop, a free end of strap makes surprisingly much drama at the right wind speed.
6. Permanently attached lid
When you open the lid, the straps will hold it on the sides of the Cannier. It is not convenient to look for a place to put it down, we really wanted to avoid that.


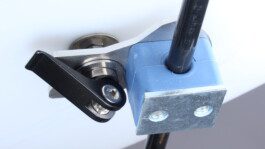
7. Easy mounting and locking
It is effortless to lock and unlock the DIY bike bag on the rack with the quick release, thanks to the added elastomer.
8. Replaceable and repairable
Strap adjusters are not sewn into the straps. We wanted to keep all parts of the DIY bicycle pannier easily replaceable and repairable.


9. Silent rolling.
When empty, the Cannier's plastic body does not touch the rack, to avoid drum noises. When loaded, it sits on the rack tubes.
10. Adaptability
The Cannier set can be adapted to cans with volume between 10 l and 35 l. You can simply mount the strap using a different hole to adjust the length. Punching so many holes on a textile strap is not an easy task because you need to seal the cuts with heat, and deal with the molten residue at the same time. We came up with a semi-automated method, and cut the holes with a CNC laser on straps placed inside a mold, instead of punching them. This also gives us the possibility to cut the holes perfectly spaced between them. Clean, fast, and cost effective.

In case you would like to produce and source your own parts kit for your homemade bikepacking bag instead of ordering it from us, go to the tutorial section. We will give you all the help you need with that.


Cannier Set - the DIY pannier parts kit
Here you can find some of the aspects that were considered in the design process of the parts. It can also give you ideas on how to use your Cannier.
Design considerations
1. A tight grip
We always wanted a homemade pannier that would have a tight grip on the rack tube, so we only settled for a locking mechanism that is completely fixed in closed position. It feels sturdier and safer, and reduces rattling noises.
2. When the Cannier is taken off
No moving parts are left on the bicycle when the Cannier is taken off, so rattling noises are completely eliminated.
3. Strap durability by design
The holes on the Cannier straps are precisely spaced for the washers to exert sideways pressure on the folded edges, preventing even more the slipping and deformation of the straps. A strap that could slip under the washers would get loaded unevenly at the center.
4. Fast handling
The Cannier's lid can be closed with a single move by pulling down on the side straps simultaneously.
5. Low response to wind
The idea of the sewn hoop first came up as a solution to wind-related noise. Without the extra rigidity and weight on the end of the hoop, a free end of strap makes surprisingly much drama at the right wind speed.
6. Permanently attached lid
When you open the lid, the straps will hold it on the sides of the Cannier. It is not convenient to look for a place to put it down, we really wanted to avoid that.
7. Easy mounting and locking
It is effortless to lock and unlock the DIY bike bag on the rack with the quick release, thanks to the added elastomer.
8. Replaceable and repairable
Strap adjusters are not sewn into the straps. We wanted to keep all parts of the DIY bicycle pannier easily replaceable and repairable.
9. Silent rolling
When empty, the Cannier's plastic body does not touch the rack, to avoid drum noises. When loaded, it sits on the rack tubes.
10. Adaptability
The Cannier set can be adapted to cans with volume between 10 l and 35 l. You can simply mount the strap using a different hole to adjust the length. Punching so many holes on a textile strap is not an easy task because you need to seal the cuts with heat, and deal with the molten residue at the same time. We came up with a semi-automated method, and cut the holes with a CNC laser on straps placed inside a mold, instead of punching them. This also gives us the possibility to cut the holes perfectly spaced between them. Clean, fast, and cost effective.
In case you would like to produce and source your own parts kit for your homemade bikepacking bag instead of ordering it from us, go to the tutorial section. We will give you all the help you need with that.

© rackhackers srl - Romania, CUI 46317393, reg. com. J5/1713/2022
Terms and Conditions | Privacy Policy | Refund and Returns | Consumer Protection (ANPC)
© rackhackers srl - Romania, CUI 46317393, reg. com. J5/1713/2022
Terms and Conditions | Privacy Policy | Refund and Returns | Consumer Protection (ANPC)